Galaxy Series LinuxCNC Configuration
From PROBOTIX :: wiki
Welcome to the new Galaxy Series Universal Configurator. This script will reconfigure the LinuxCNC software to add or remove features on your machine and has additional functionality to manage the most common problems in the hopes of maximizing uptime on your machine. This script will also be used to install software updates when they are released. Follow the on screen prompts carefully, but do not worry if you make a mistake as you can simply re-run the script to correct any errors.
Important: Only run this script when you can afford to have the machine go down temporarily, as you may need to call us if anything goes wrong. We have tested this script several hundred times on as many machines as we could, but as with any software update, results can go not as you planned. If you are concerned, then CALL US TO SCHEDULE A TIME TO DO THE UPGRADE.
Contents
Getting Started
- Download this file:
- Probotix.zip - version 2.2.1-1.6 uploaded 12:31, 7 March 2018
- Copy the probotix.zip file to a freshly formatted 8GB or larger USB thumb drive. Make sure the thumb drive is formatted FAT32 - NTFS formatted drives will not work.
- Insert the thumb drive into the LinuxCNC PC. After a few seconds a window will pop up displaying the contents of the thumb drive. Right click on the probootix.zip file and choose the "Extract Here" option.
-
- This creates a folder called 'probotix'. Move into the probotix folder by double-clicking it.
-
- In this folder you will see a file called 'probotix.sh'. Launch that file by double-clicking it.
-
- A dialog will pop up and ask you what you want to do with the file. Chose the "Run in Terminal" option.
-


Follow On-Screen Prompts
Step 0: New Install or Upgrade Existing installation?
- New Install: Delete any existing files and reinstall.
- Upgrade Existing: Updates the custom Probotix files like our StepConf and our version of Axis.
Step 1: Enter your order number or 00000.
Step 2a: Choose which machine you have.
- If you have a custom size machine, you need to enter the X & Y travel here.
Step 3a: What type of up-rights does your machine have?
- The new Tall up-rights have a triangle cut out, the older Short ones do not.
- All 2018+ machines have Tall up-rights.
Step 3b: How many Z-axis bearings do you have?
- 2018+ machines have four (4) Z bearings, older have two (2) Z bearings.
Step 4: Do you want the machine to run in inches or mm?
Step 5a: Do you use a router or one of the 80mm VFD spindles?
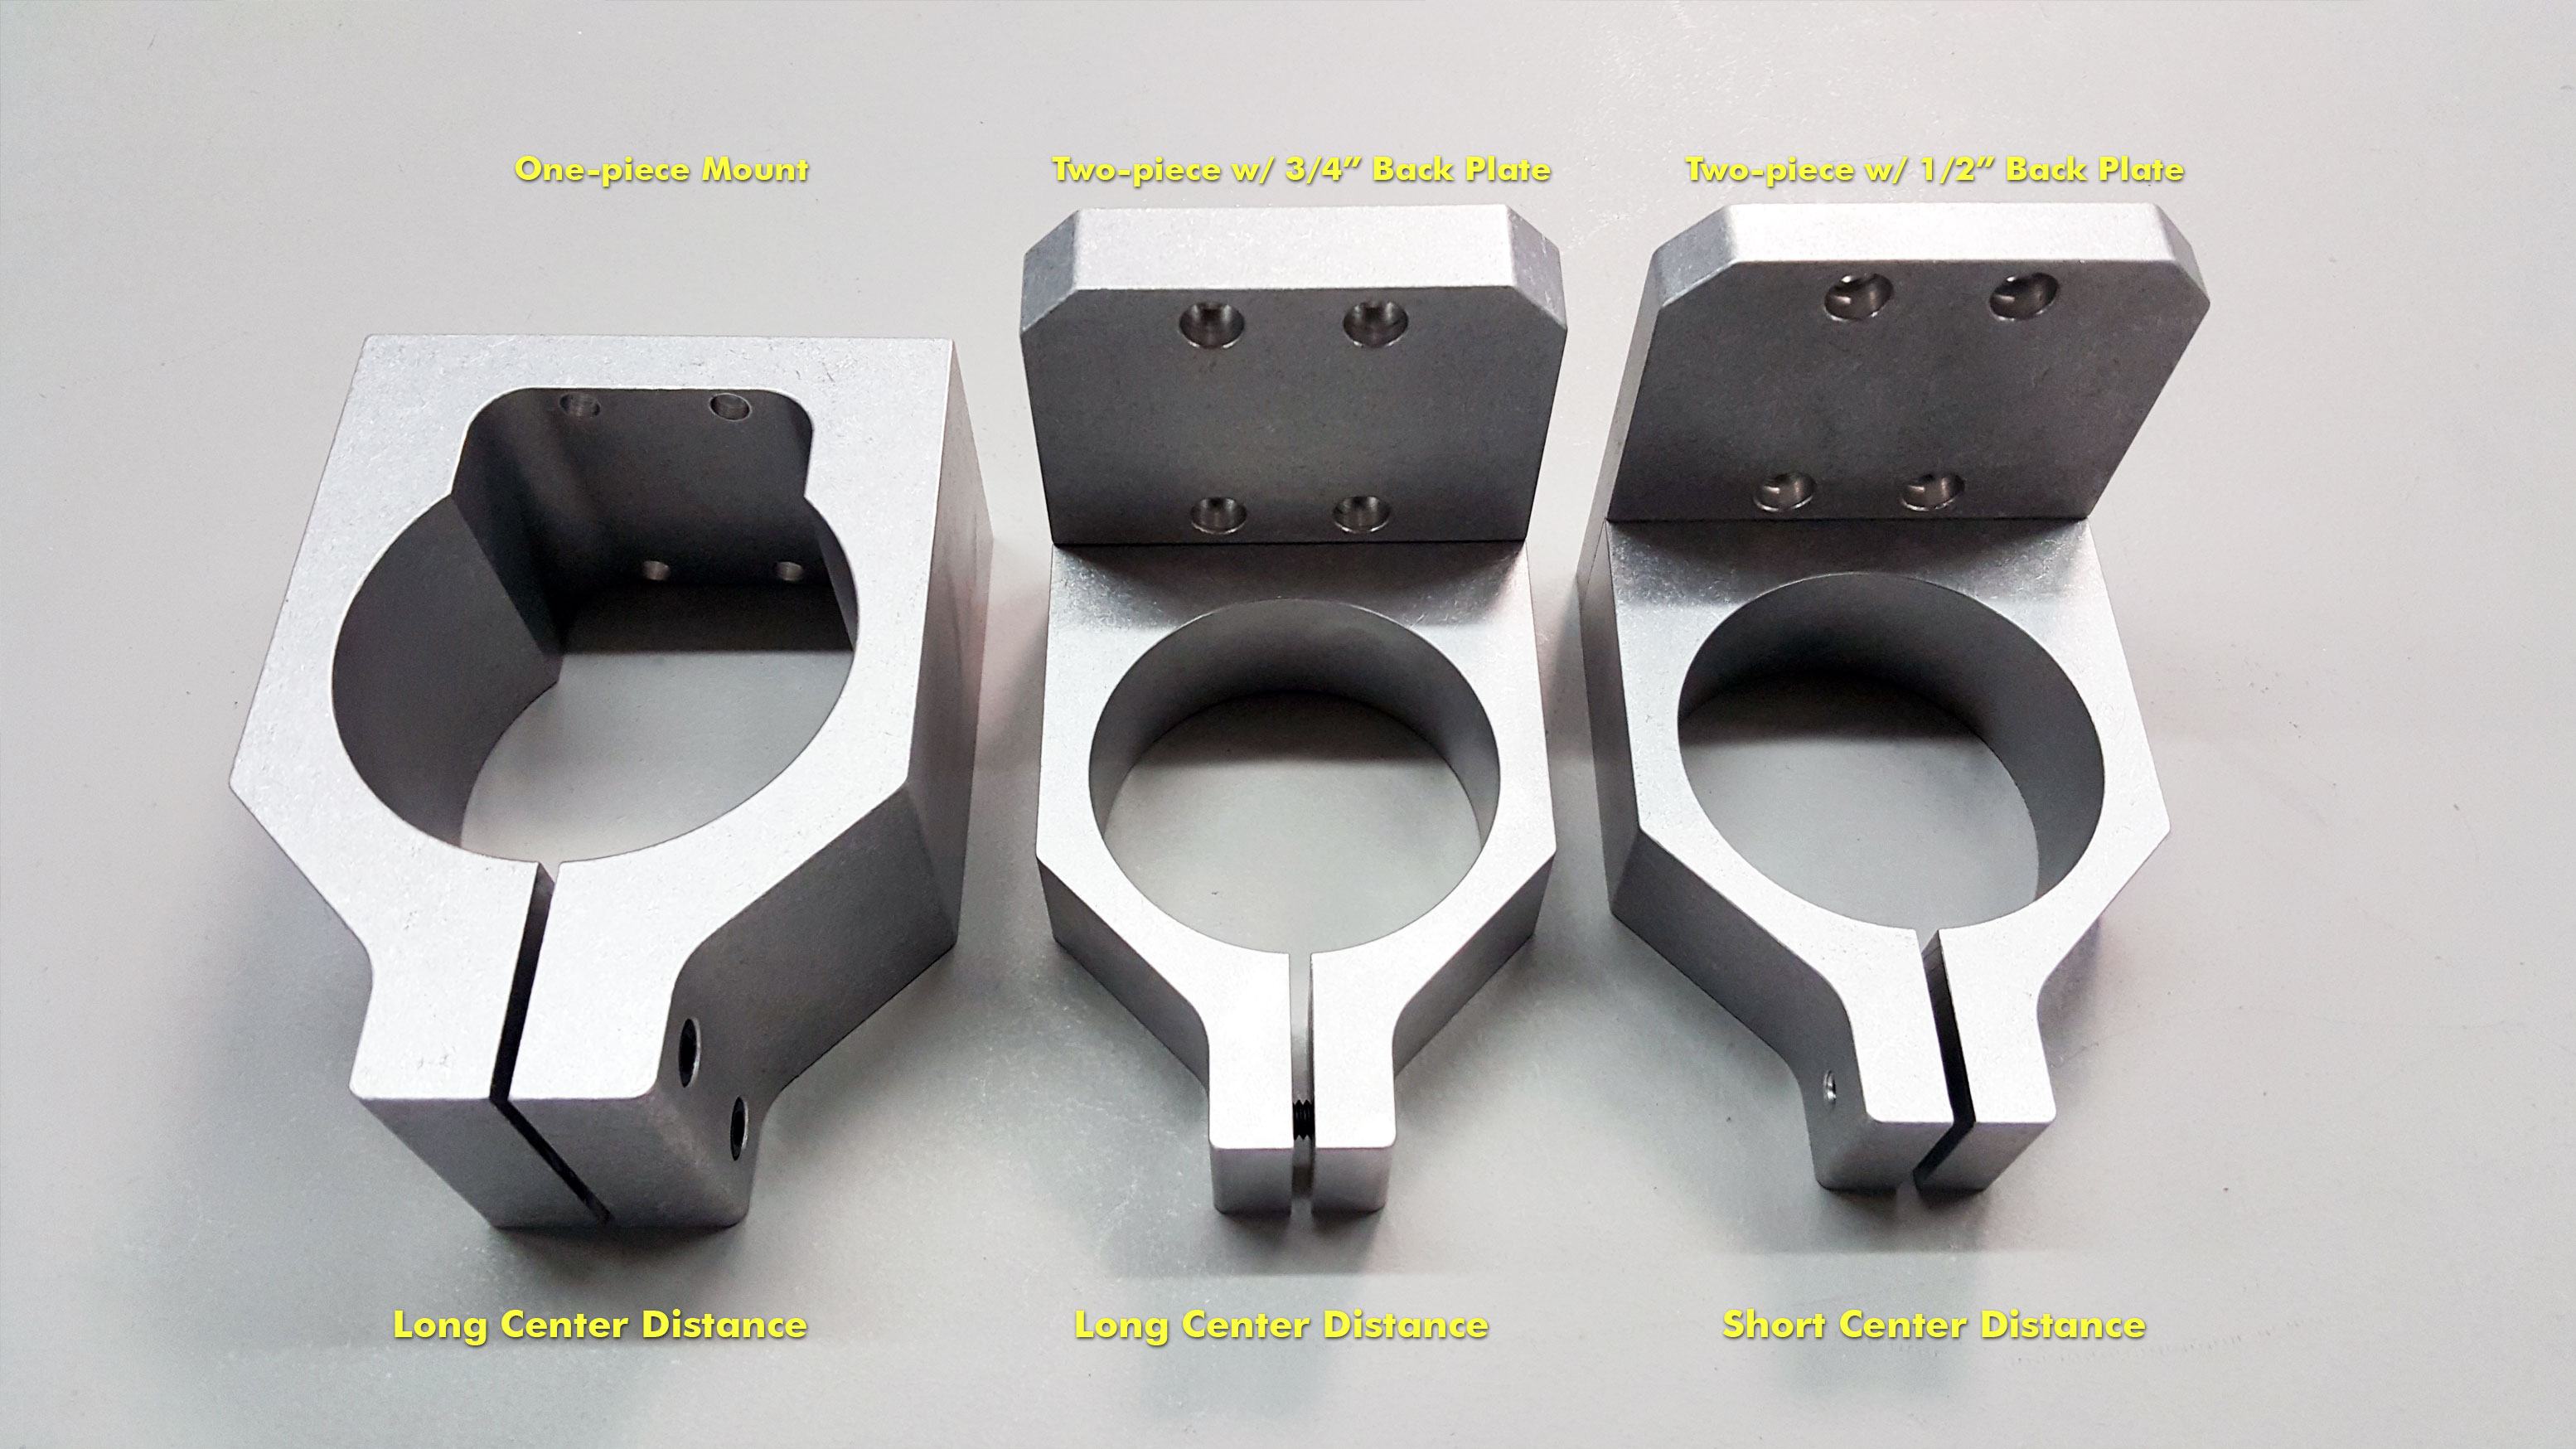
Step 5b: If you have a router, you need to choose which mount you have so that we can adjust for the distance to the center of the tool.
- Here is a diagram to help decide: [Router Mount Diagram].
- All 2016+ machines have long center distance.
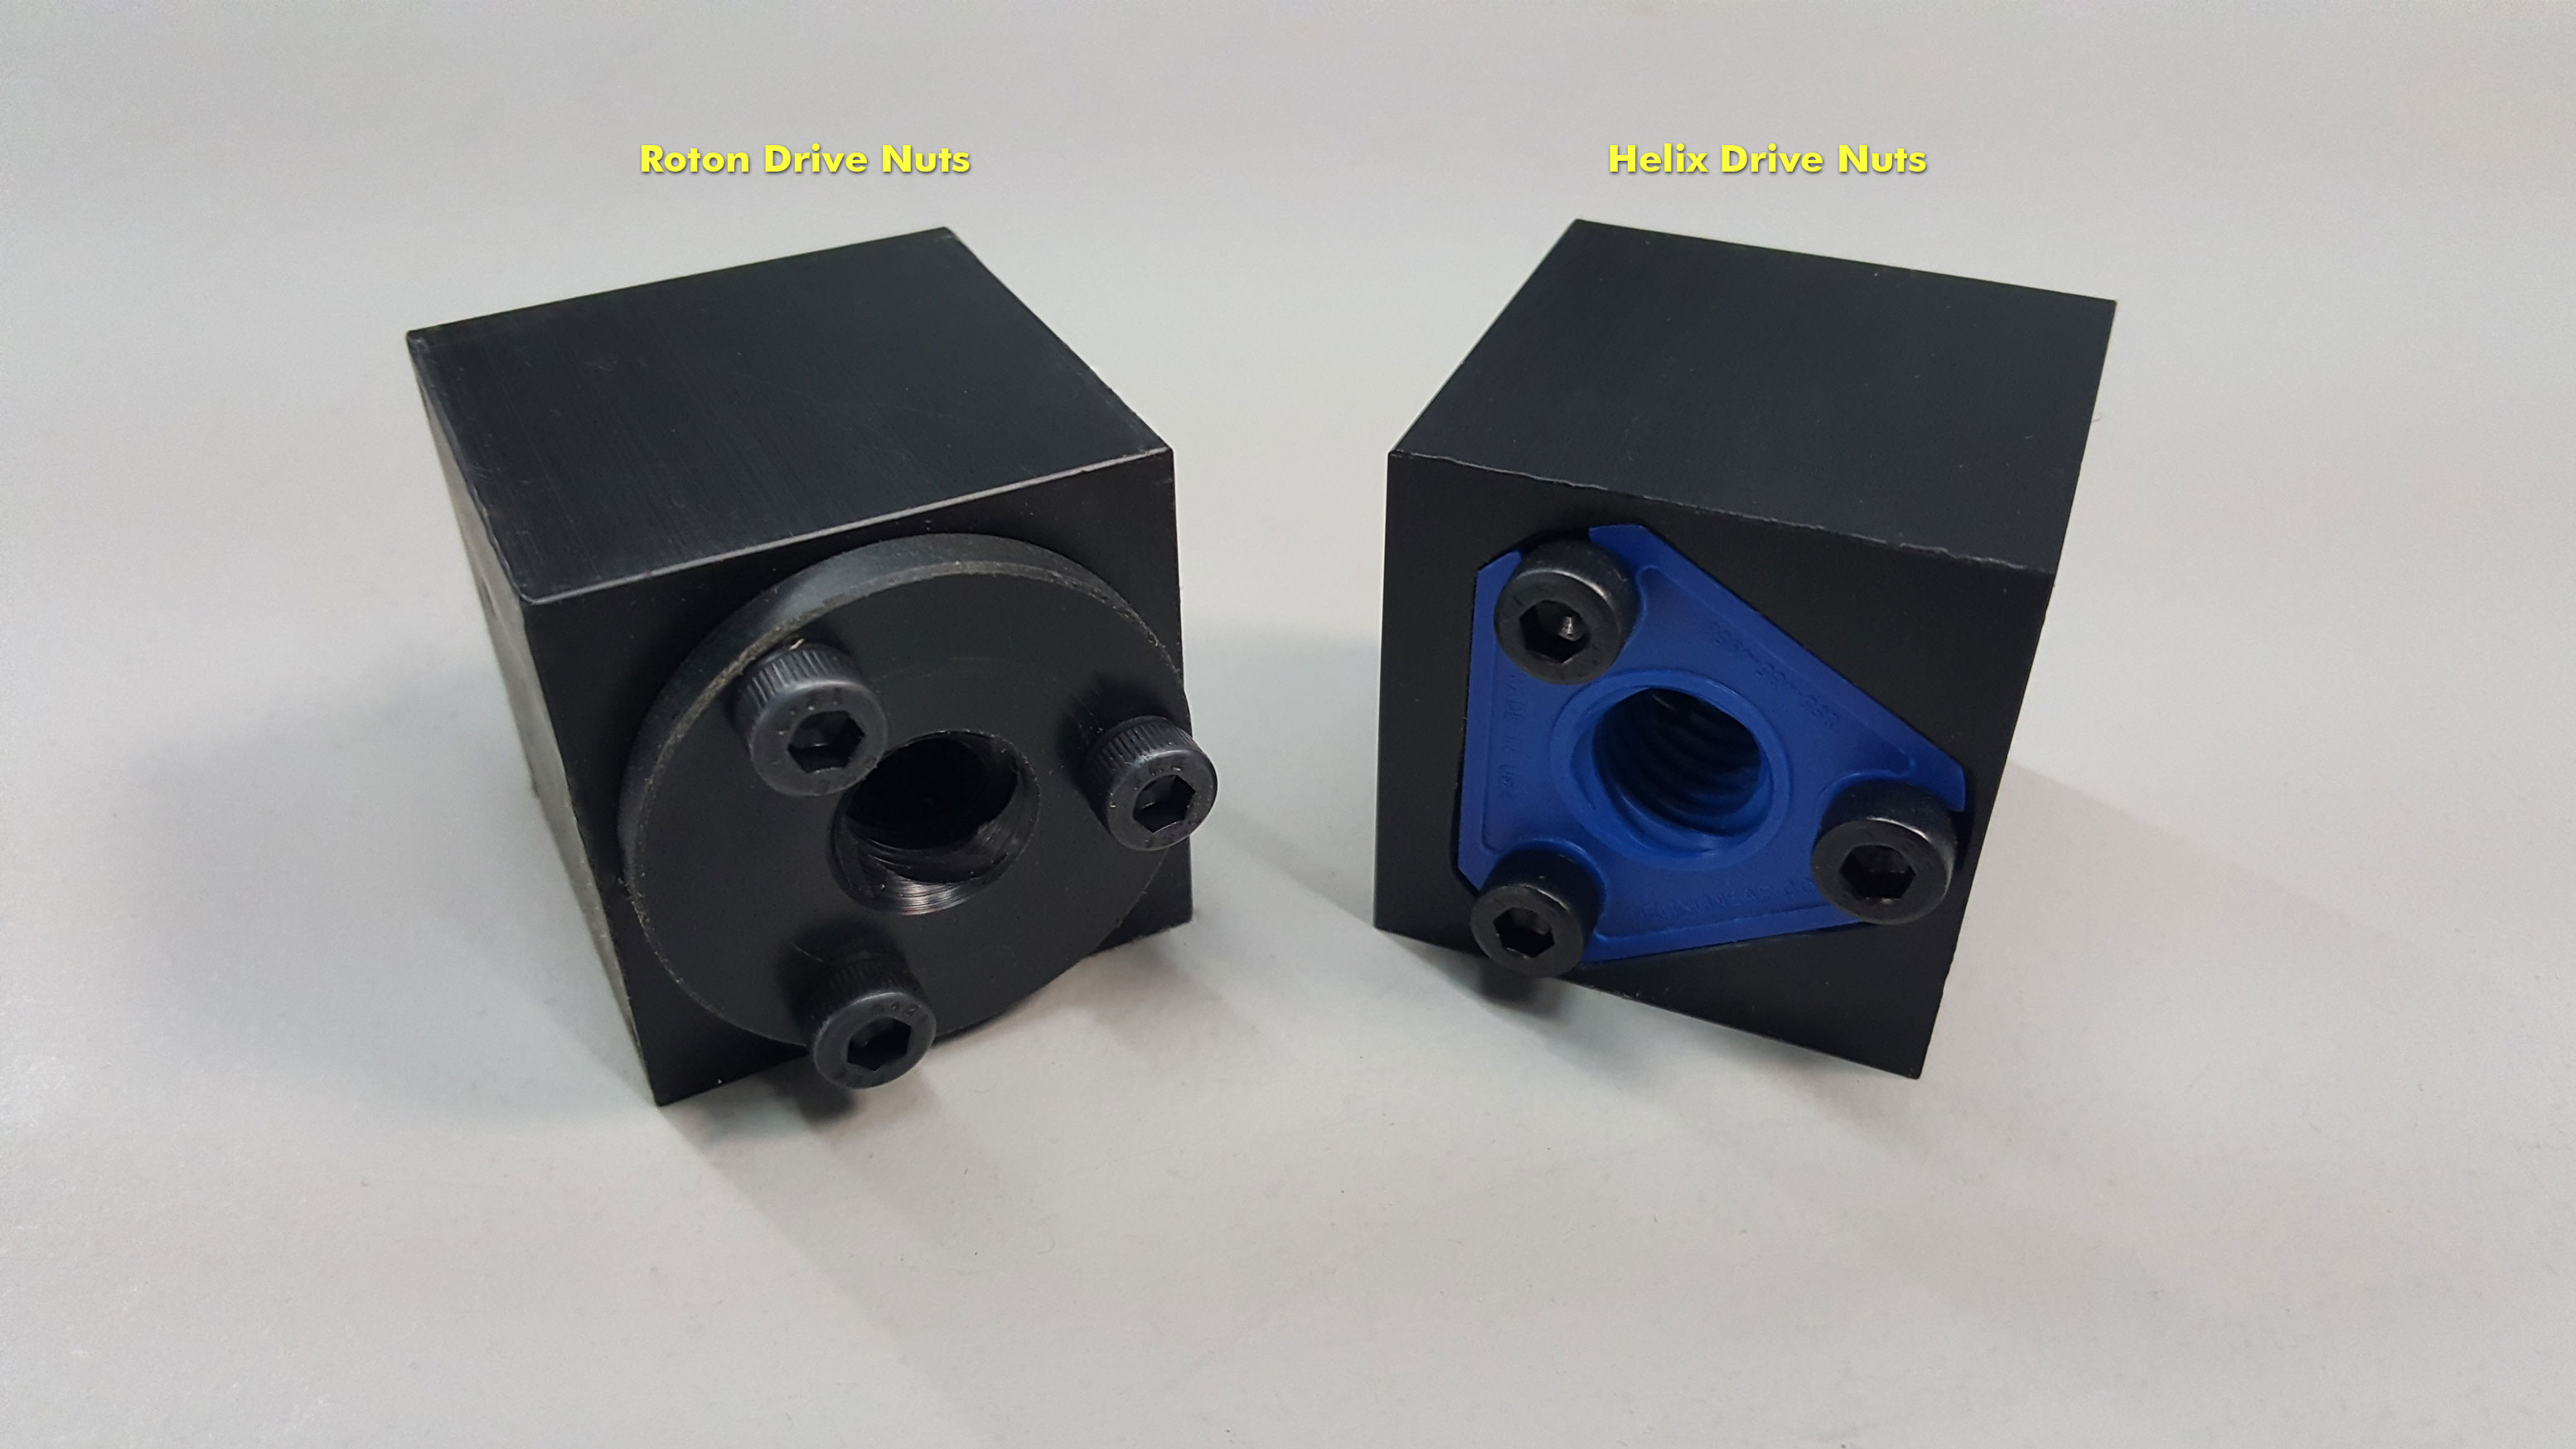
Step 6: Do you have the older Roton (black drive nuts) or the newer Helix (blue drive nuts) ACME screws?
- Here is a diagram to help decide: [Drive Nut Diagram].
- All 2016+ machines have Helix.
Step 7: Do you have the older Probostep (uni-polar, beige control cabinet) or newer MondoStep (bi-polar, black cabinet or Unity controller) drivers?
Step 8: Do you use the gamepad jog controller or the MPG Pendant?
Step 9: Accept the default parallel port addressing, or enter custom addressing if instructed by us to do so.
Step 10: Do you use the ATLaS tool sensor, the Z-puck, neither or both?
- If you use the Z-puck, this step will ask you for the height of your puck. Measure your puck with a set of calipers and enter the inch or mm measurement here.
- Here you can also move the Unity parallel cable to the second port for diagnostics if directed by us to do so.
Step 11: Do you use the rotary axis?
Step 12: On this step you can swap a motor to the A-axis header. You can do this if you have a driver failure to get back up and running in a hurry while waiting on replacement parts.
- You will lose use of the rotary when configured like this.
- On older controllers with ProboSteps, the 5-pin connector labeled A is actually Y2, and the unmarked 5 pin is A.
Step 13: If you are having intermittent limit switch issues from faulty switches or electrical noise, you can configure the machine to use soft limits only.
Axis v1.6 Interface

- New desktop background and LinuxCNC launch splash screen
- There is now a folder shortcut to the nc_files directory right on the desktop. Now you can just drag your g-code files onto this shortcut after the windows pops up showing the contents of your USB thumb drive.
- The new configurator will allow you to set the interface to run natively in metric (mm) mode.
- LinuxCNC will now run initializing g-code in case your post processor doesn't insert the proper setup codes.
- [Home All] has been renamed to [Home Machine]
- [Touch-off] has been renamed to [Set Axis Origin]
- After homing, the machine used to drive to the center of the table. Now the park after homing position is at absolute machine zero (front/left/up).
- The G28 Button has been replaced by the [Bring To Front] button. It is now hard coded to be the center of the back of the machine all the way up on the Z. G28 is now free to use for other purposes.
- The G30 Button has been replaced by the [Park At Rear] button. It is also now hard coded, but to the center of the front of the machine all the way up on the Z. G30 is now free to be used for other purposes.
- There is a new [Return To Home] button that will bring the machine back to machine zero home.
- There is a new [Return to X/Y Origin] button that will drive the machine back to the X/Y origin of the part.
- [Load 1st Tool] has been renamed to [Measure First Tool]. If you do not have the ATLaS tool sensor, this button will no longer appear.
- There is a new [Set Z Origin] button for quickly setting the current z position to zero for the current coordinate system.
- If you have the Z-Puck, there is a new button for setting the Z-axis origin using the Z-puck. Click here to learn how to use it:Z_Touch-off_Puck
- There is a new [Set X/Y Origin] to quickly set both the X & Y origin to zero for the current coordinate system simultaneously.
- There is a new [G-code Reset] button that runs the initializing setup codes again. Use this button if you get lost, for instance if you forget what coordinate system you are in. The setup codes are G0 G54 G17 G20 G90 G40 G49 G64 P0.010 for machines configured for inch.
- Joint number on limit switch errors will now display the axis name instead of the joint number.
- The ATLaS tool length sensor location is now hard coded in the 100.ngc file. If you have your sensor mounted any place other than the factory location, you will need to manually edit the 100.ngc file.
- ATLaS tool change routine is now o100 [tool_number] for both inch and mm configs.
- ATLaS tool change routine will now skip driving to the front if the tool has already been measured.
Other (less sexy) things the configurator does
- Changes color of terminal window to classic linux shell (well, kinda sexy).
- Installs php scripting engine
- Installs numlockx to force numb lock key on
- Installs g-code-filter.php to clean up .ngc2 files (not sexy, yet - but its gonna be)
- Tries to identify secondary parallel port address, copies lspci output to thumb drive incase you need to email it to us
- Disables screensaver and idle screen lock
- Uninstalls the update manager
- Turns line numbers on in gedit
- Assigns [q] key to toggle pause/resume - works like feed hold on machining centers